
Pan de muerto (literally, bread of the dead) is a sweet bread that is almost always included in Day of the Dead offerings, and traditionally eaten on November 2nd, El día de los fieles difuntos, or Día de los muertos (Day of the Faithful Departed, or Day of the Dead.) It is fashioned in a round shape which may represent the natural and endless cycle of life and death, and decorated with small pieces of the same dough to symbolize bones and tears. Although it is well accepted that wheat baked goods were introduced to Mexican territory during Spanish colonial times, it is still much debated when this particular treat was created. I have found stories that mention: 1) early colonial times in the 1550s, in an effort by Catholic priests to put an end to human sacrifices; 2) sometime in the mid 1800s, when the upper class in independent Mexico could afford good quality baked goods; or 3) as late as the 1930s as a purely commercial enterprise! Since unfortunately only one of the stories had an actual reference, which I could not follow up, I will leave the timing as “uncertain” for now, and I will try to find more reliable and traceable sources of information to support the background stories. In the meantime, I am confident enough to include this recipe for “quick” bread of the dead, in quotation marks because the time from scratch to out-of-the-oven is still of about four hours, but I was able to reduce it from between 8 to 36 hours for some of the more traditional recipes, thanks to the use of instant dry yeast.
Day of the Dead Bread – Pan de muerto
Printable recipe: Day of the Dead Bread
Ingredients
To test yeast:
1 envelope (8 g) instant dry yeast
¼ cup lukewarm water
1 tsp granulated sugar
For dough:
4 cups all-purpose flour
6 eggs
½ cup butter; softened but not runny
1 tsp salt
½ cup granulated sugar
2 tbsp orange blossom water (or rose water)
1 tsp ground star anise (or orange zest, optional)
½ tsp nutmeg (optional)
For brushing before baking:
1 egg
For coating after baking:
2 tbsp butter, melted
Granulated sugar
 Instant yeast may be sprinkled directly on the flour with the rest of the ingredients, but I always like to pre-mix with lukewarm water and sugar in a small bowl, to test if it is still viable, and to give it a headstart. After a few seconds, it should start bubbling and dissolving in the sugary water (photo right):
Place flour in a large bowl, forming an opening in the centre; reserve. Gather the rest of the ingredients:


To the centre of the flour, add the other dough ingredients: six eggs, softened butter, salt, sugar, and flavourings (I used only rose water); add the yeast mixture at the end:

Incorporate loosely with a spatula, then dump mixture onto a clean working surface:


Knead the mixture by folding edges over to the centre, flipping and trying to pick up the dough; this will seem impossible at first, since the dough will be extremely sticky. Continue kneading, pulling, folding and flipping; do not add any flour for the first 25 to 30 minutes (photos below, from left: dough after 10, 20 and 30 minutes of kneading):


The dough will become elastic and easy to handle, and almost all of a sudden, will come off easily from hands and table. If it is too sticky at this point, add a sprinkle of flour and continue kneading, until the dough comes off the table and may be stretched without breaking:


Form a ball, pinching the dough together towards the centre, then place in a slightly greased bowl, pinched side down (photo below, left), cover, and let rest in a warm spot. In the meantime, prepare two baking sheets by lining with parchment paper. Instant yeast only requires letting the dough rise slightly at this step, for about 40 minutes (photo below, right):


Knead lightly and form into a log; cut into four sections (photo below). Place sections back in the bowl, and keep covered, working with one at a time:

Form one of the sections from above into a log, and cut a small portion, of about a quarter or a fifth; reserve (photo below, left). Form a round domed shape with the larger section, again pinching the dough towards the centre, and keeping the seam down; place on one of the prepared baking sheets, pressing softly to flatten the dome to form a round shape of about five inches in diameter (photo below, middle). Take the reserved smaller piece, and roughly divide into thirds; form one piece into a ball, again pinching, reserving, with the seam facing down. The other two pieces are rolled into ropes, and using wide spread fingers, make indents to form four bumps, shaping like a beaded string (photo below, right):


Beat the last egg lightly, brush the top of the round piece on the baking sheet, then place the beaded ropes across each other:


Press in the middle with one finger; brush ropes with egg wash:


Place the reserved small ball on the top of the indent at the centre; this is the final shape of the bread. Repeat with the other three sections of dough from the bowl, placing two breads on each baking sheet:
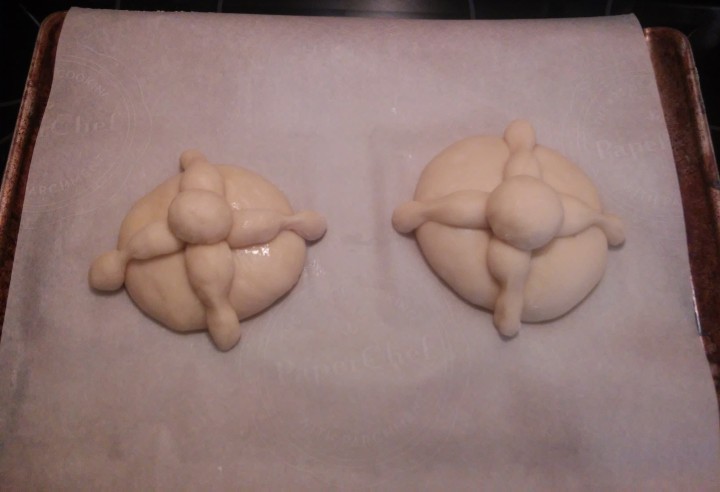
Keep in a warm spot, checking every hour or so, until the breads rise and look really swollen (photos below from left: one bread after forming; same bread after one hour; and after two hours):


Very carefully brush breads with egg wash a second time. Place trays in the oven, pre-heated to 350°F (180°C). After 15 minutes, switch bottom tray to the top and top one to the bottom, and also rotate each tray 180 degrees, so the side that was facing the front of the oven, faces the back:

Bake for another 15 minutes, until golden brown (note the size now!):

Transfer to cooling racks, and let rest for at least half an hour; brush with melted butter, then sprinkle with granulated sugar:


I saved one bread for my Day of the Day offering; the round shape at the top represents a tear, shed for the departed, and the elongated shapes along the sides symbolize bones:

My family and I enjoyed some of the other bread with hot chocolate. As it may be appreciated in the photo at the top of the post, the bread had a wonderful texture and crumb, well worth the time spent preparing and baking. In recent years, different fillings (such as whipped cream, chocolate sauce, custard and even Nutella!) have been added either in the centre of the bread before baking, or to sliced bread before eating; it is probably a nice variation, but I prefer not to taint the traditional flavour of this delicious bread.
Letter of Pope John Paul II for All Souls’ Day (November 2nd, 1998): “For the souls in purgatory, waiting for eternal happiness and for meeting the Beloved is a source of suffering, because of the punishment due to sin which separates them from God. But there is also the certitude that once the time of purification is over, the souls will go to meet the One it desires.”
This sweet treat is going to Fiesta Friday #248 hosted by Angie @ Fiesta Friday (she was exhausted, like most of us, after Halloween night, but now TGIF!) this week with co-hosts Judi @ cookingwithauntjuju.com and Alex @ Turks Who Eat (both Judi and Alex have great recipes with impressive photos and advice.) And also great news: my Birria – An Exceptional Dish, has been featured on this week’s party, thank you so much, Angie!


This looks wonderful! I shall try it one day 🙂
LikeLiked by 1 person
Please do, it is delicious!
LikeLike
Looks yummy!
LikeLike
And tastes yummy, as well, thanks Donna!
LikeLiked by 1 person
Looks like a delicious and fitting gift from the kitchen for Dia de los Muertos. Another recipe I will definitely be trying out. I like the history and background information you give with the recipes ❤
LikeLiked by 1 person
Let me know how you liked it, thank you so much for your kind comment!
LikeLiked by 1 person
This looks delicious. I’m going to bookmark the page and give it a try.
LikeLiked by 1 person
Thank you, let me know how you liked it!
LikeLiked by 1 person
Thanks for sharing! I can almost smell that bread through my screen! 😀
LikeLiked by 1 person
Hi, Jennifer! Strangely enough, I believe you, hee hee 🙂
LikeLiked by 1 person
Great; now I’ve drooled all over my keyboard. Thanks a bunch.
LikeLike
Sorry, Ron! If it’s any consolation, I did the same when uploading my photos 🙂
LikeLike
Interesting! Thanks for sharing. It is a lot like Finnish pulla, but of course the shape and meaning is of interest here.
LikeLike
Is pulla an everyday bread, or for a special time? Thank you for your kind comment!
LikeLike
It is both -yes!
LikeLiked by 1 person
The recipe looks great and the outcome looks absolutely delicious! Beautiful tradition from our heritage. Thank you for sharing Comadre.
LikeLiked by 1 person
I like the looks of your bread Irene and looks like I will have to make it next year (since today is Nov.3rd) . 🙂 I always appreciate a little history on any recipe and so do many at Fiesta Friday. Thanks for sharing…
LikeLiked by 1 person
What a gorgeously rich bread! But a full half-hour of kneading? Wow! But I love the flavors: orange blossom water, anise, nutmeg … I bet this is quite a treat.
LikeLike
It is a lovely bread. I think the kneading time depends also on the strength of the baker; I saw a video of two artisan bakers in Mexico and they finished a whole tub of dough in that time! This is the Central Mexico version, but I can hardly wait for next year to try a recipe from Oaxaca, that calls for a lot of egg yolks, sesame seed, … sigh! So many breads, so little time, he he. Thank you for your comment, Jeff!
LikeLike
Reblogged this on My Slice of Canada and commented:
I am still away in Mexico, and I thought re-blogging this recipe would be nice, in case it was missed last year. It will also be a reference for my next post, in which I share a recipe for a different kind of bread, also made for the Day of the Dead in the Mexican state of Oaxaca.
Happy baking, everyone!
LikeLike