Click here to go to printable recipe: Danish Dough Bowties and Cream Horns
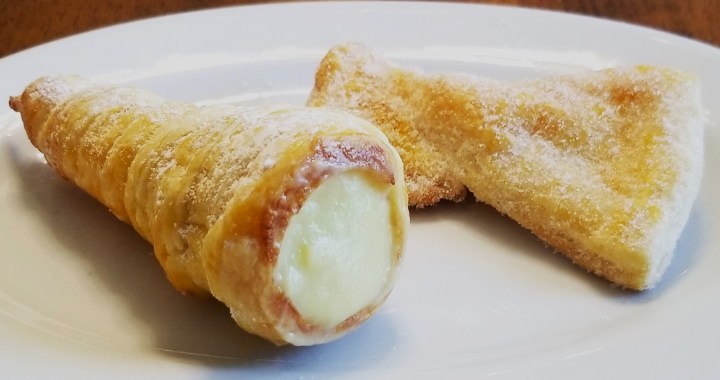
Continuing with more options for pan dulce (Mexican sweet bread) to bake with the homemade Danish dough from my last post, in addition to Danishes (spiral buns), European bakers overtly introduced other well-known confections, such as tartaletas (small tarts), tecolotes (owls), rehiletes (pinwheels), and the two other classics in the Mexican bread basket I chose for this post, as seen in the photo above, moños (bowties) and cream horns, popularly known as cuernos de la abundancia (horns of plenty). Danish dough bowties are simple to make starting with a rectangular shape, and are sprinkled with granulated sugar after baking. For cream horns, although using puff pastry is common practice, in Mexican bakeries, they are more often made with Danish dough; as the name indicates, they are filled with cream, the most common types being whipped (chantilly), custard, or pastry creams, and get dusted with icing sugar just before serving.
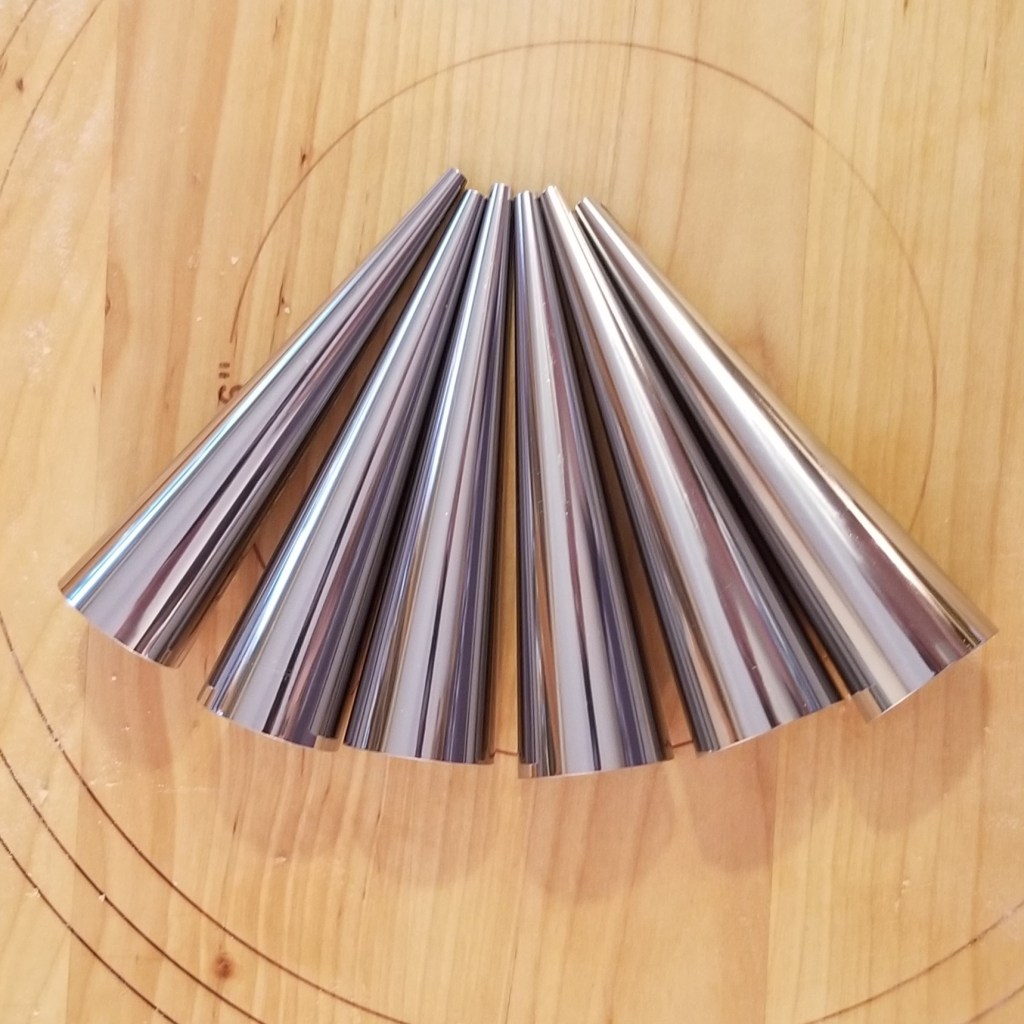
In the past couple of years, I have received some baking utensils and moulds as gifts. Although not indispensable, they have added more possibilities to hatch new creations, certainly making easier to achieve special shapes and presentations. I have published a recipe for Gaznates, pastry tubes filled with meringue, using tubes made at home with cardboard and foil; they worked relatively well, but they were single-use and a little flimsy. After that, I got some stainless steel moulds, which made subsequent batches prettier, more environmentally friendly, and easier to prepare; the set also came with moulds for cannoli, and these conical moulds:
For this batch, I chose pastry cream as the filling. There are many recipes available; I like Jacques Pépin’s Crème Pâtissière, just reducing the amount of sugar by a little bit.
Pastry Cream – Crema pastelera
Printable recipe: Pastry Cream – crema pastelera
Ingredients (for approximately one cup)
3 egg yolks (save whites for other applications)
1 tsp vanilla extract
½ cup granulated sugar
3 tbsp flour
1 cup milk
Place egg yolks, vanilla and sugar in a mixing bowl; beat vigorously, preferably with an electric mixer, until the mixture becomes pale, and drops into ribbons when some is lifted with the beater, about 3 minutes. Sift flour on top, and whisk just until smooth.
Warm up milk in pan over medium heat, until it starts to boil gently. Remove from heat and gradually add to the egg mixture, whisking constantly to prevent lumps. Once all is integrated and smooth, cover and allow to cool down to room temperature. Use right away, or store in the fridge for up to three days.

Danish Dough Bowties/Cream Horns –
Moños/cuernitos de la abundancia con pasta danesa
Printable recipe: Danish Dough Bowties and Cream Horns
Ingredients (for 12 to 15 pieces)
¼ batch Danish dough (click here for printable recipe)
1 egg
For bowties:
¼ cup granulated sugar
For cream horns:
2 batches pastry cream (printable recipe above)
¼ cup icing sugar
Prepare one baking sheet by lining with parchment paper. Set aside. Beat egg in a small bowl, and reserve.
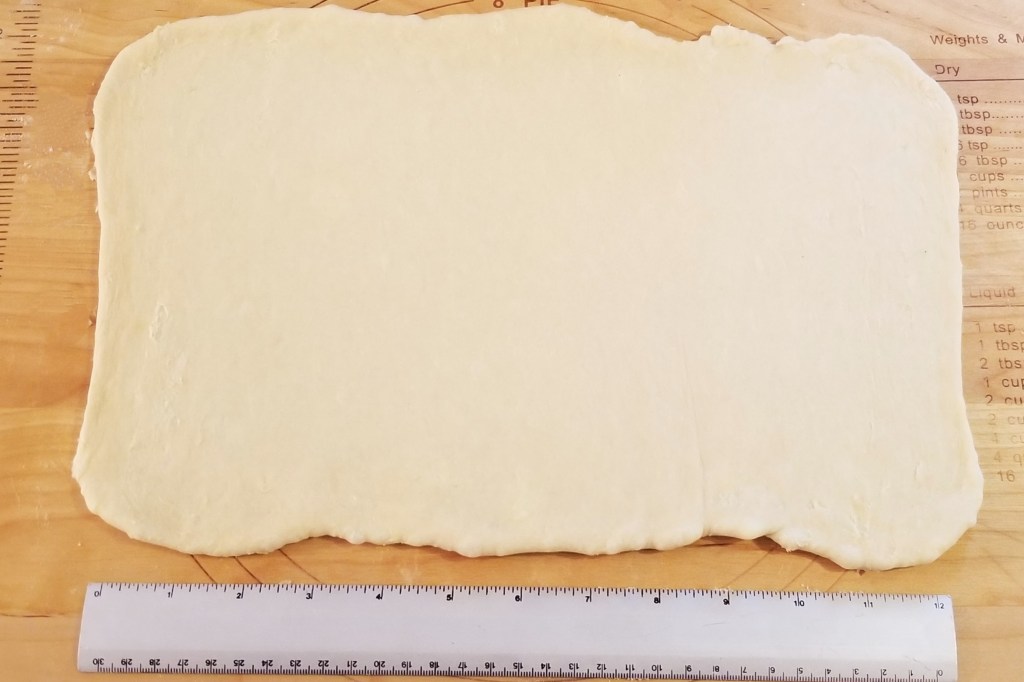
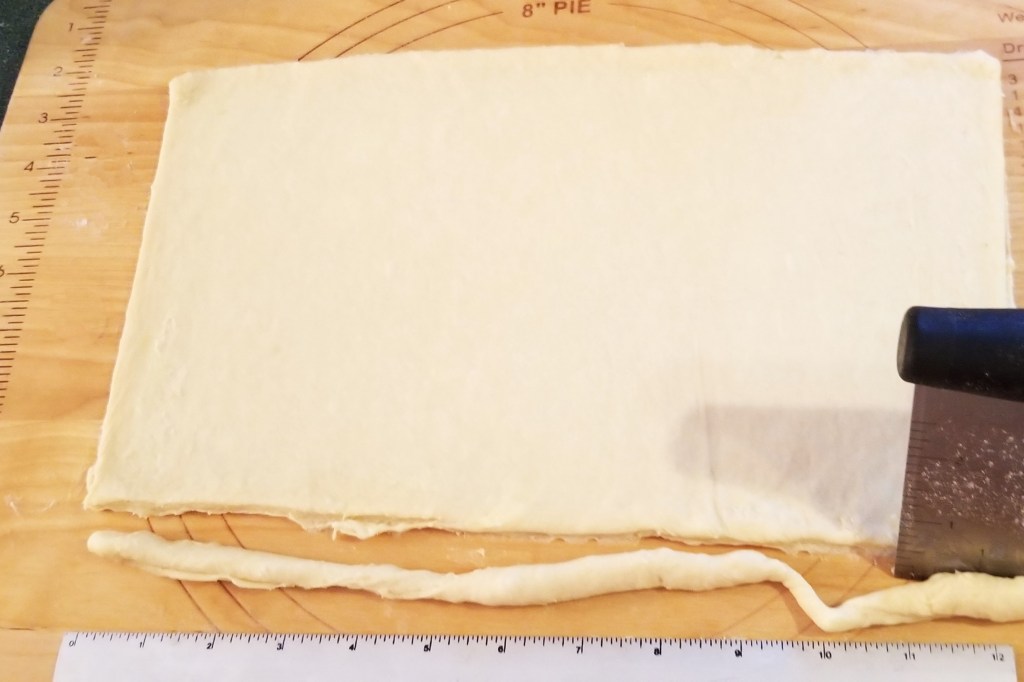
Roll dough into a rectangle, slightly bigger than 12×8 inches (30×20 cm, photo below, left). Trim the edges to make a sharp rectangle of that size (photo below, right):
For bowties, mark long edge every 2 inches (2.5 cm), and short edge halfway (4 inches – 5 cm), and cut rectangle into a grid of 12 rectangles 2×4 inches (2.5×5 cm) each. For horns, cut strips of approximately half an inch (1.25 cm) in width. I am making half a batch of each:

The residual dough may be rolled and cut into more rectangles or strips, as wanted. I cut them into strips for more cones.
For bowties, place one rectangle on baking sheet, pulling short ends gently, then twisting one half, to form the bowtie. Continue with the rest of the rectangles (photo below, left). Allow to rest for 30 minutes. Brush with the reserved egg (photo below, right):


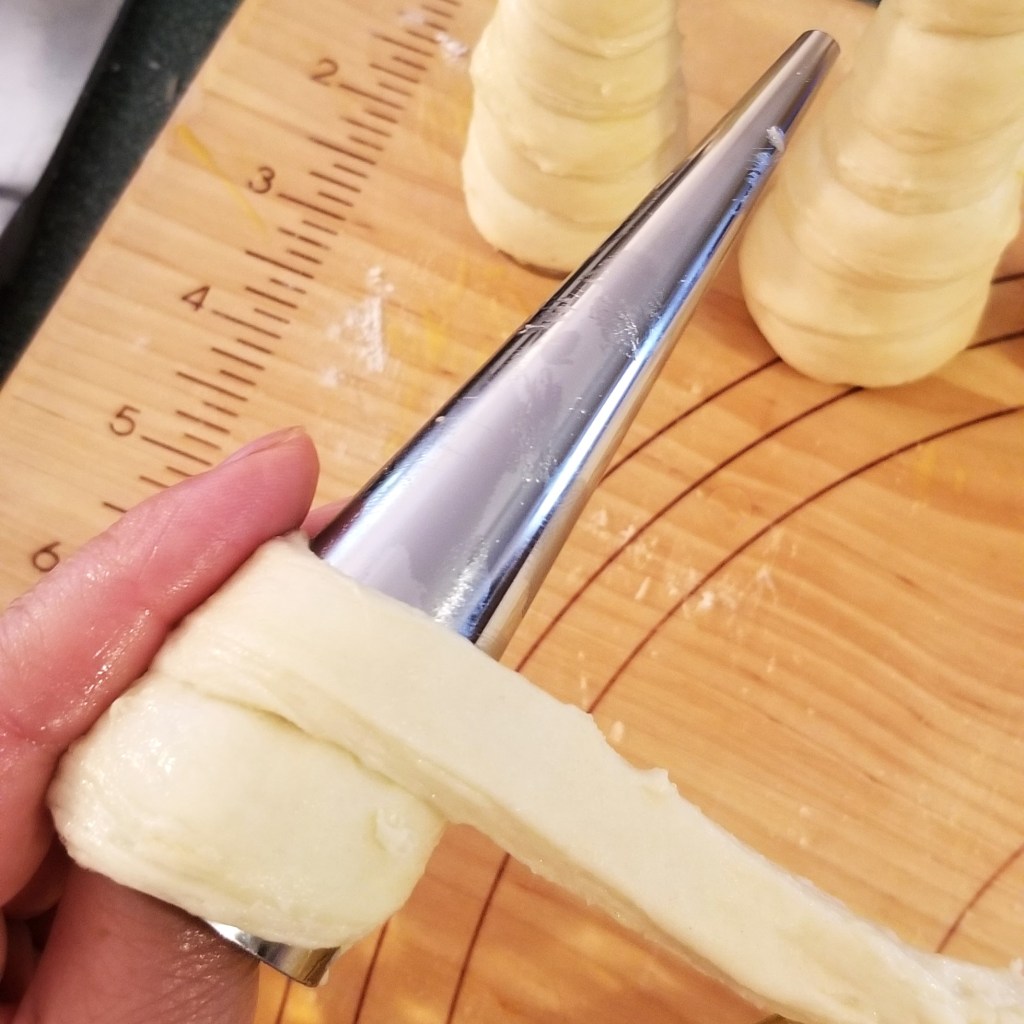
For cream horns, wrap a strip of dough around a metal cone mould, starting at the base; overlap dough as you go around the cone, pulling dough with one hand, and patting down on the cone with the other, to thin and seal layers together (photo below, left). If more than one strip is needed, brush a little of the reserved egg at each end (photo below, centre). Place on prepared sheet, either lying horizontally, or standing vertical on the base. Continue with the rest of the dough; allow horns to rest for 30 minutes, then brush with reserved egg (photo below, right):


Preheat oven to 375ºF (190ºC). In the photo below, six bowties and 7 (and a little extra) horns, ready to be baked:

Bake for 20 to 25 minutes, until golden-brown:

For bowties, coat with granulated sugar while warm:


For cream horns, allow to cool down to room temperature, then just before serving, fill with pastry cream, and dust with icing sugar:
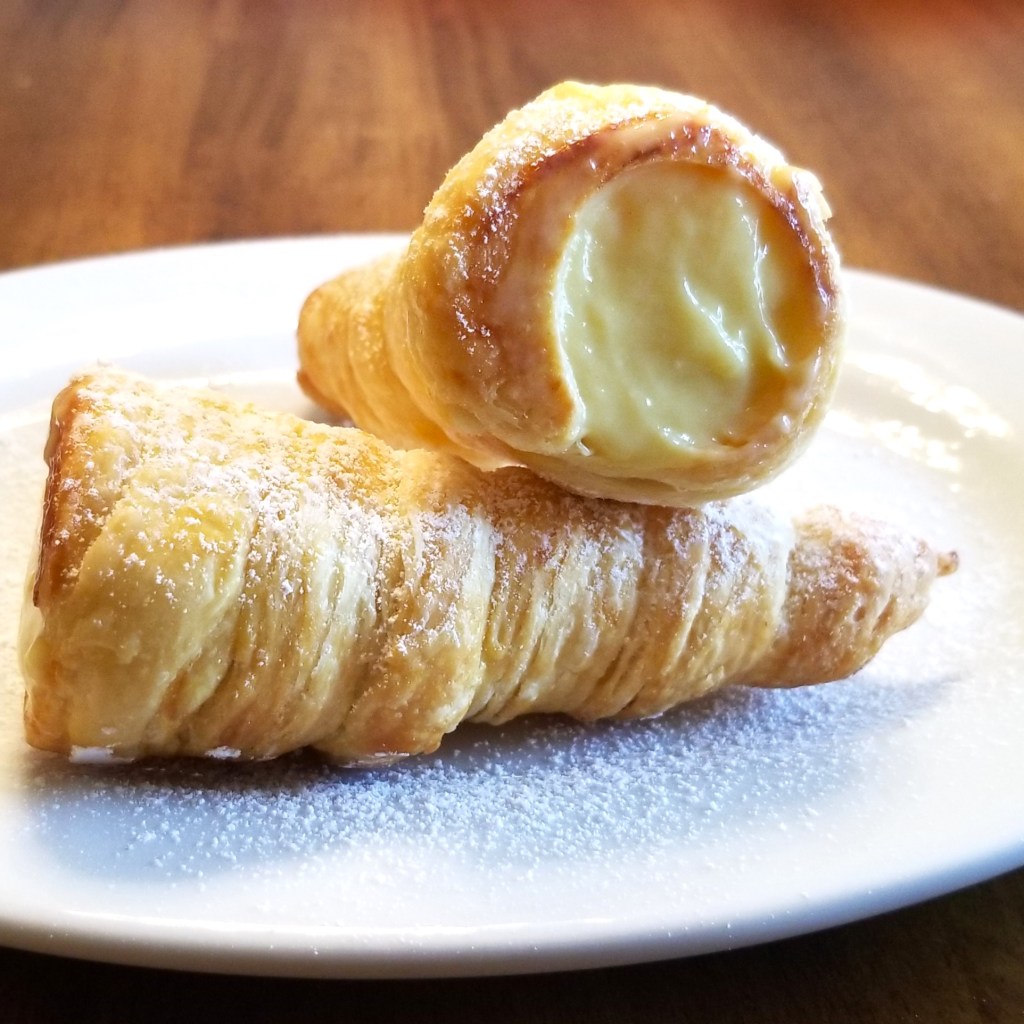
These beautiful confections are delicious with a cup of coffee, tea or hot chocolate, and are best enjoyed within two days, which proved not to be a problem at all around here.

For your convenience, click on the highlighted text below for products available on Amazon™. DISCLAIMER: Any reviews included in this post are my own, for items I have purchased, not provided by any company; as an Amazon Associates Program affiliate, I might receive a commission for any purchases originated from the links below, at no extra cost to you. Thank you to readers who have bought other products starting with a click from my links.

I am bringing my recipe to Full Plate Thursday #677 with Miz Helen @ Miz Helen’s Country Cottage.
I am also sharing my post at Thursday Favourite Things #643, with Bev @ Eclectic Red Barn, Pam @ An Artful Mom, Katherine @ Katherine’s Corner, Amber @ Follow the Yellow Brick Home, and Linda @ Crafts a la Mode.
I am joining Fiesta Friday #520 with Angie @ Fiesta Friday, this week co-hosting with Jhuls @ The Not So Creative Cook.
I am sharing my recipe at What’s for Dinner? Sunday Link-Up #455 with Helen @ The Lazy Gastronome.


Mmm, they look and sound scrumptious.
LikeLiked by 1 person
Thank you, Fandango, they were!
LikeLiked by 1 person
These look delicious!
LikeLiked by 1 person
Thank you, Laci, they truly are!
LikeLiked by 1 person
They look excellent. One of those with a nice hot chocolate would be the highlight of my day 😉
LikeLiked by 1 person
Mmmh, I agree!😋
LikeLiked by 1 person
Amazing to see how these are made!
LikeLiked by 1 person
Hi, Irene. These look like something I know I would enjoy! The step-by-step instructions and pictures make it seem so easy to follow. Thanks for sharing and for joining Fiesta Friday Party! We hope to see you again.
LikeLiked by 1 person
Thank you Jhuls, and thank you for hosting!
LikeLike
These look awesome!! Thanks for sharing at the What’s for Dinner party. Have a lovely weekend and we’ll see you tomorrow!
LikeLiked by 1 person
Thank you, Helen, see you there!
LikeLike