
Click here to go to printable recipe: Basket Tacos, de canasta
These tacos originated in the small town of San Vicente Xiloxochitla, in the Mexican state of Tlaxcala. The original repast simply consisted of corn tortillas filled with potatoes or beans, layered with onions in a container, and drowsed with hot melted lard or boiling oil; the tacos were wrapped to keep them hot and allow them to get steamed; for this reason, these tacos are also called tacos sudados – “sweaty” tacos. Rapid infrastructural and economic growth in the mid-20th century created the need for filling and inexpensive foods that could be purchased by workers outside hospitals, office buildings and around constructions sites; some taqueros (taco masters) in San Vicente decided to take their business to larger cities, such as Puebla and Mexico City, to respond to that need. They prepared their tacos in large batches, and packed them in a basket (hence the name) lined with plastic, and layers of Kraft brown paper to absorb excess fat and moisture; the tacos were then covered with more paper, and tablecloths, to keep them hot long enough to be carried to convenient and busy locations to be sold.
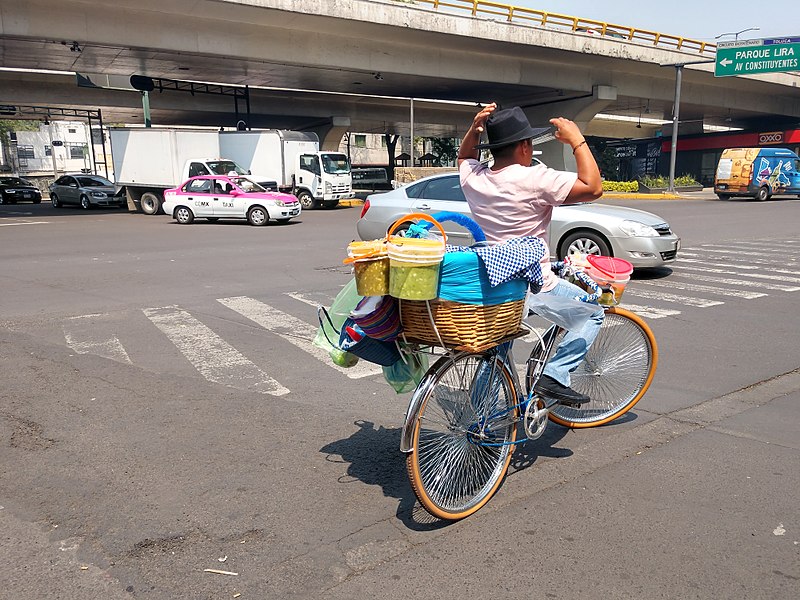
Since then, the sight of a guy riding a bicycle with a large basket lined in plastic (almost always blue plastic, for some unknown reason), and a huge batch of bright green sauce in tow, became ubiquitous in Mexico City (photo below, from WikiCommons):
In the olden days, empty oversized glass bottles of mayonnaise were washed and repurposed as vessels for the sauce, and the flavours for the tacos were only potatoes or beans, which fit the bill of being both filling and inexpensive. Later on, mayo glass bottles disappeared from the market, and had to be replaced with plastic tubs (as seen above), and in addition to potatoes and beans, the emblematic chicharrón en guajillo (pork cracklings in guajillo pepper sauce), mentioned in my previous post, was added as another classic filling.
Nowadays, lots of taqueros still leave San Vicente early in the morning, riding their bikes to nearby municipalities, or carried (bicycles and all) in trucks, to Mexico City or Puebla; others even spend the week in the city, and return to their homes on the weekend. There are also established stands, restaurants and catering businesses all around Mexico, dedicated to this iconic taco; other flavours for fillings have been added, such as adobo (potatoes or meat in spicy sauce), chicken, cochinita pibil, eggs and cactus, etc., and some vendors also offer guacamole or pickled jalapeños (en escabeche) in addition to the original bright green sauce (more on this sauce below.)
To make a small batch of tacos de canasta at home, I decided to forgo drowsing the tacos in boiling oil, but still giving the tortillas a quick dip in it, to prevent them from sticking or falling apart. I kept the classic trio of potato, beans and chicharrón to fill my tacos. As for the sauce, I saw the original and authentic recipe shared on a video on YouTube, which is, surprisingly, based on blended pickled jalapeños! I just scaled down the amounts to make a small batch, without changing anything else. A basket or other container may be lined with plastic and layers of Kraft paper for this recipe, or, as I did, arrange them in a slow cooker, which will keep them nicely hot and “sweaty” until serving time.
Basket Tacos – Tacos de canasta
Printable recipes:
Printable recipe: Basket Tacos, de canasta
Chicharrón en guajillo – Pork Cracklings in Guajillo Pepper Sauce
Escabeche Style Pickled Jalapeños
Ingredients (for approximately 5 dozen)
5 dozen corn tortillas (preferably small, taco size)
½ cup oil, or lard
1 white onion; peeled, and sliced
Fillings:
Potato (for about 18-20 tacos)
1 lb (454g, about 3 medium) potatoes; washed, peeled, cut into chunks
Water
Salt, to taste
Bean (for about 18-20 tacos)
2 cups cooked beans, such as pinto (homemade or drained, from can)
1 tbsp oil, or lard
½ cup liquid from cooking, or water
Salt, to taste
Chicharrón (for about 18-20 tacos)
½ batch (about 150g) pressed pork cracklings in guajillo pepper sauce (printable recipe above)
Sauce:
200 ml pickled jalapeños, with their liquid (escabeche, printable recipe above, or one small can)
½ white onion; peeled
1 clove garlic; peeled
Salt, to taste
¼ cup cilantro; washed and chopped
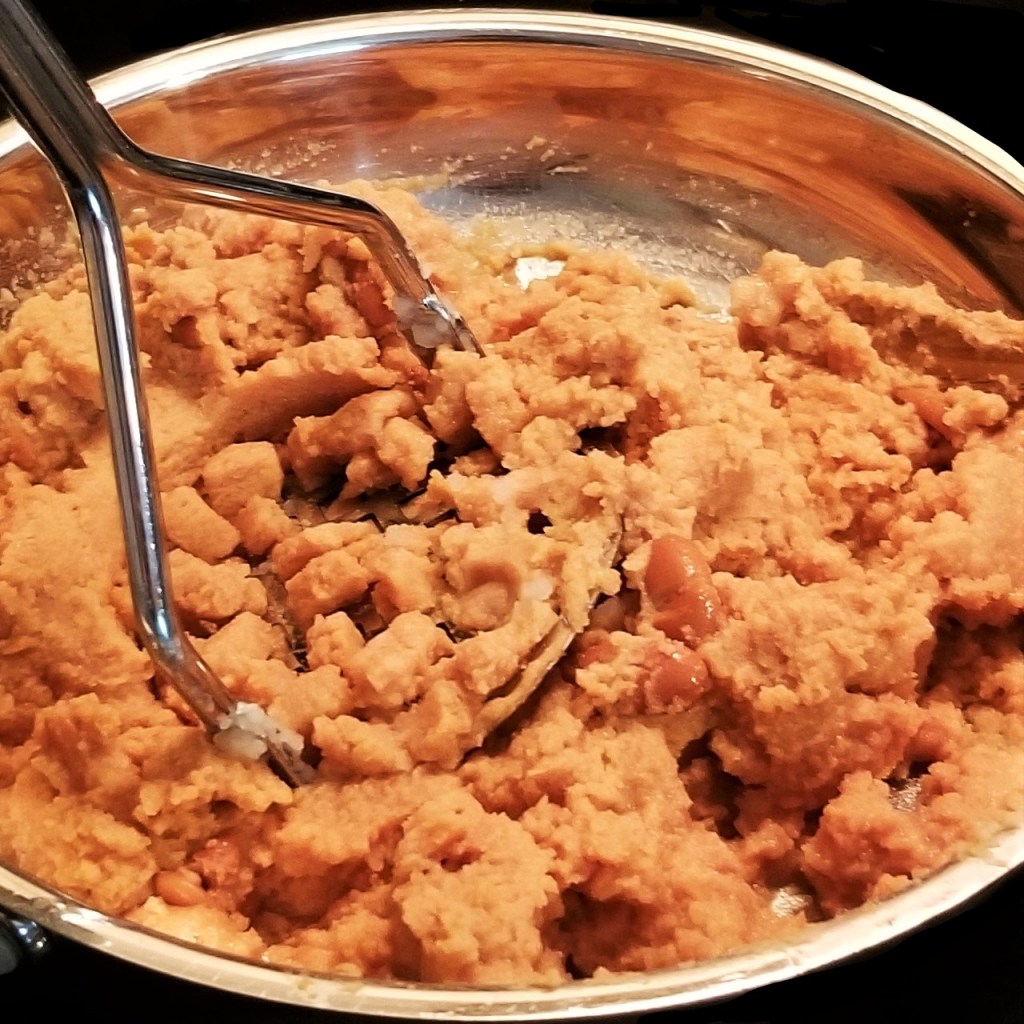
Potato filling: Place potatoes in a pot with water over high heat; bring to boil, then reduce heat to medium, cover pot and cook for ten minutes. Uncover pot, and continue cooking until potatoes are tender when tested with a fork. Remove from heat; drain most of the water, leaving about one cup in the pot (photo below, left). Season with salt, to taste, mashing until a thick paste is formed (photo below, right):


Cover and reserve.
Bean Filling: Warm up oil (or lard) in a pan over medium heat; add beans, stirring, until hot, for about one minute. Add liquid and season with salt, mashing until most of the beans have been pressed (photo below, left). Remove from heat and reserve.
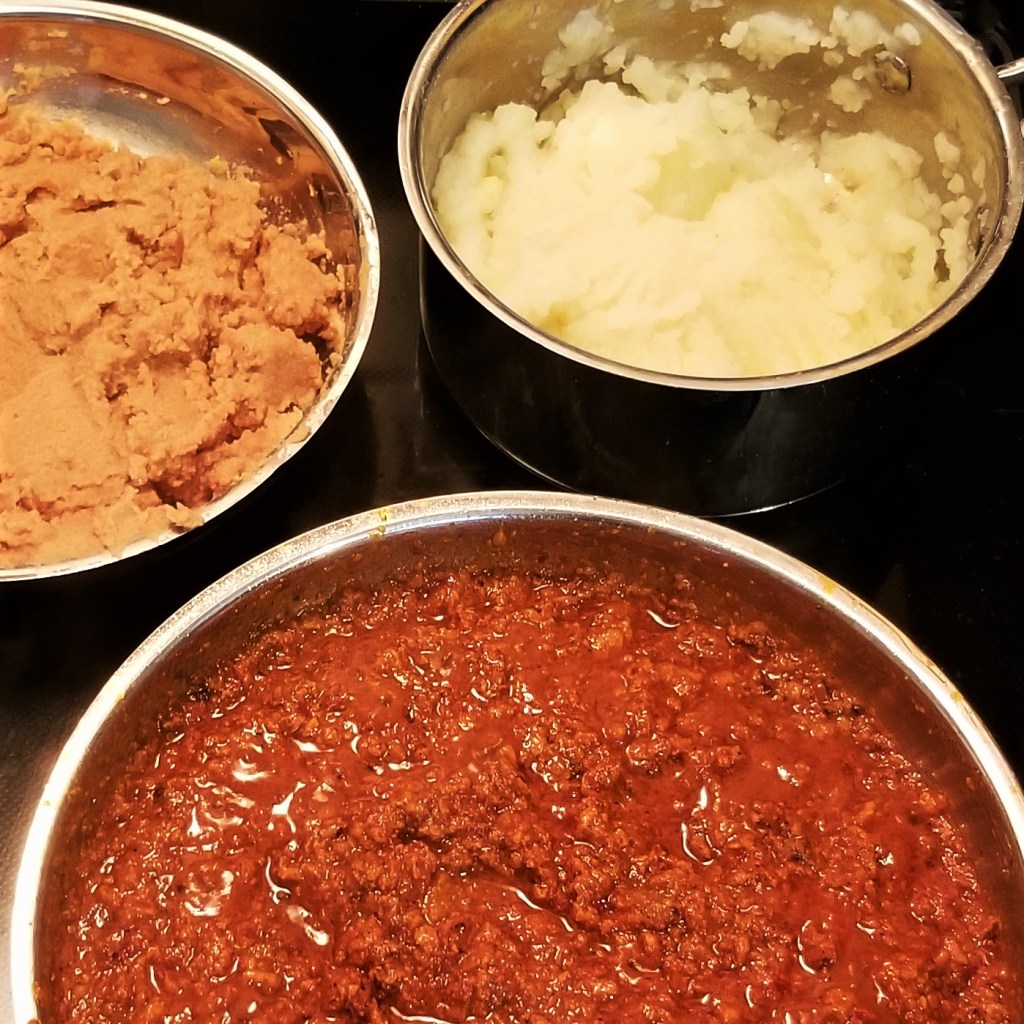
Assemble tacos: When ready to start assembling, place fillings on the stove over low/medium heat, to warm up and keep hot (photo below, right):
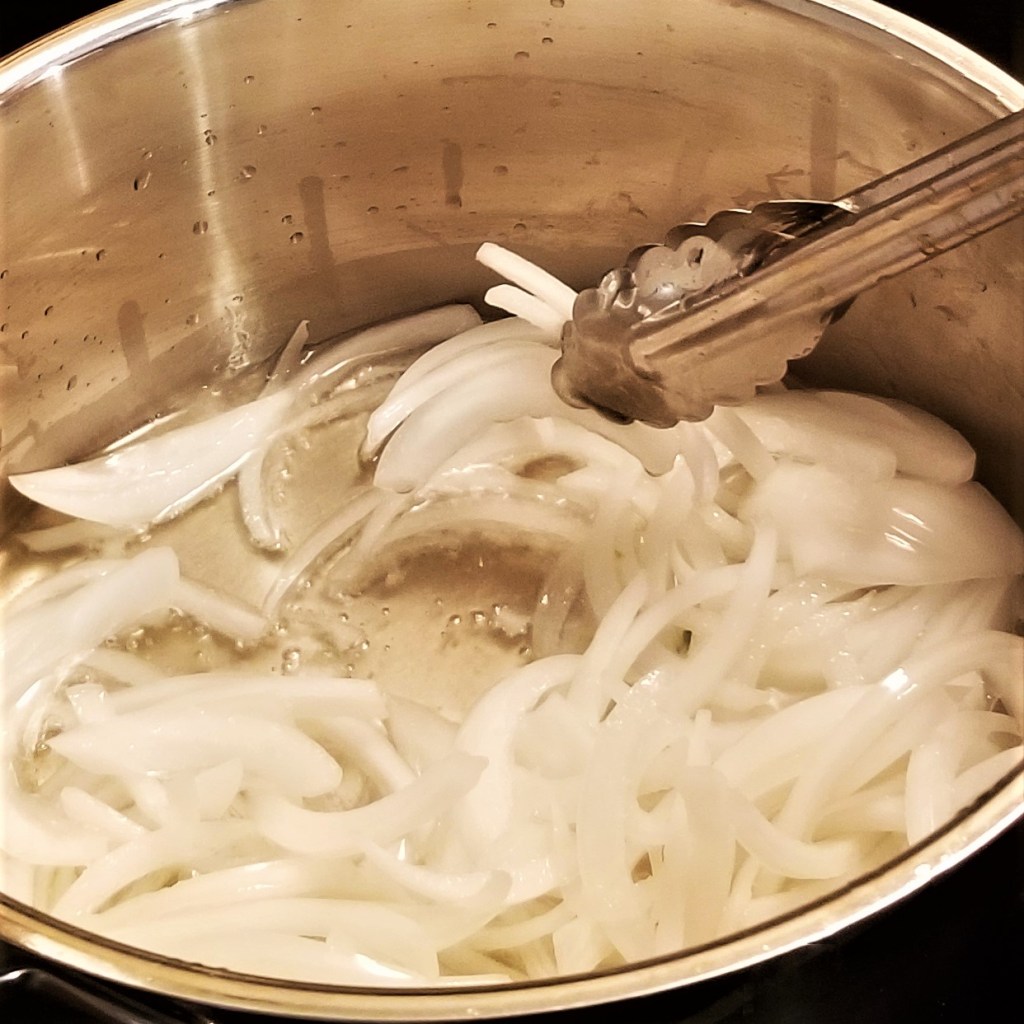
In another pan, heat up half a cup of oil (or lard) over medium/high heat, then add sliced onions; fry just for one minute or two, and make sure oil is bubbling (photo below, left). Turn off heat, and push onions to one side of the pan.
Tortillas must be warm and pliable; if freshly made tortillas are not available, warm up just a few tortillas at a time in the microwave oven, or over a griddle. Take one tortilla, dip it briefly in the hot oil (or lard), preferably handling with tongs to avoid burns (photo below, right):
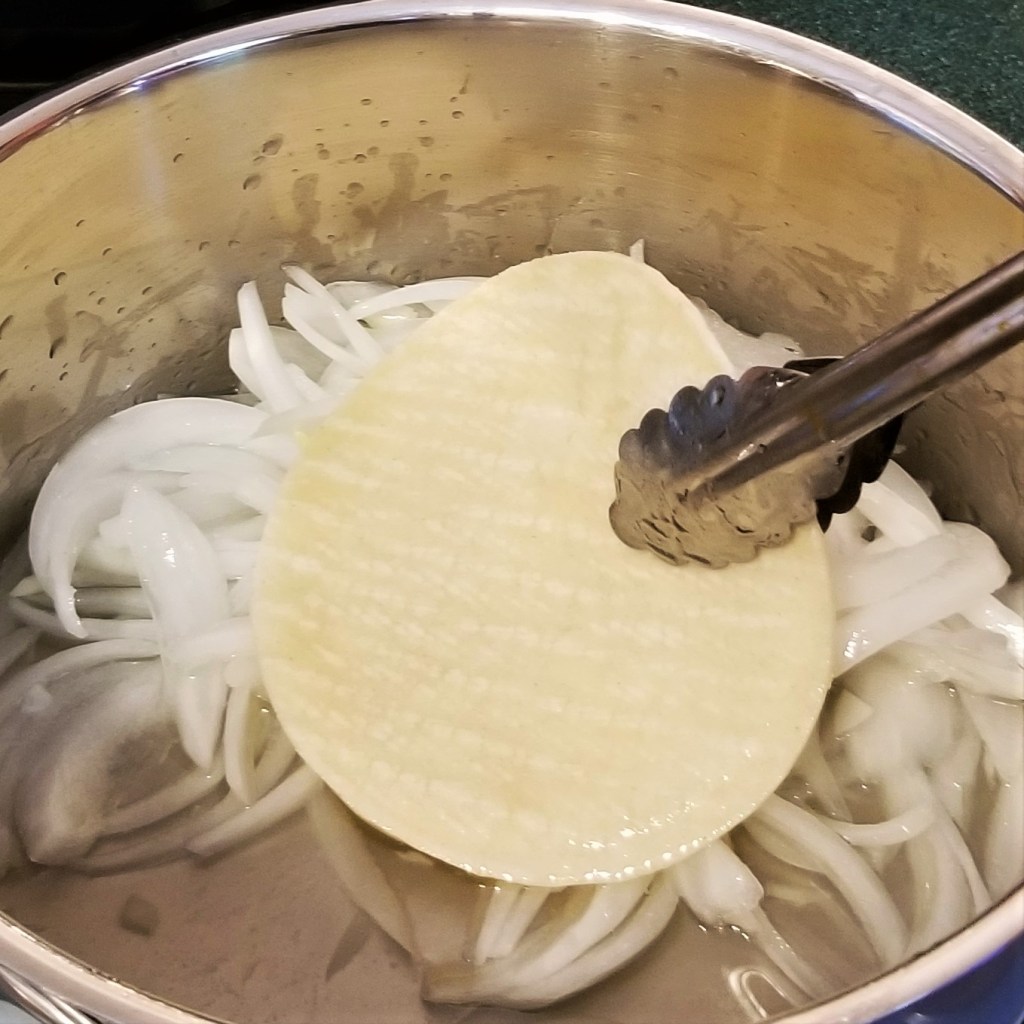
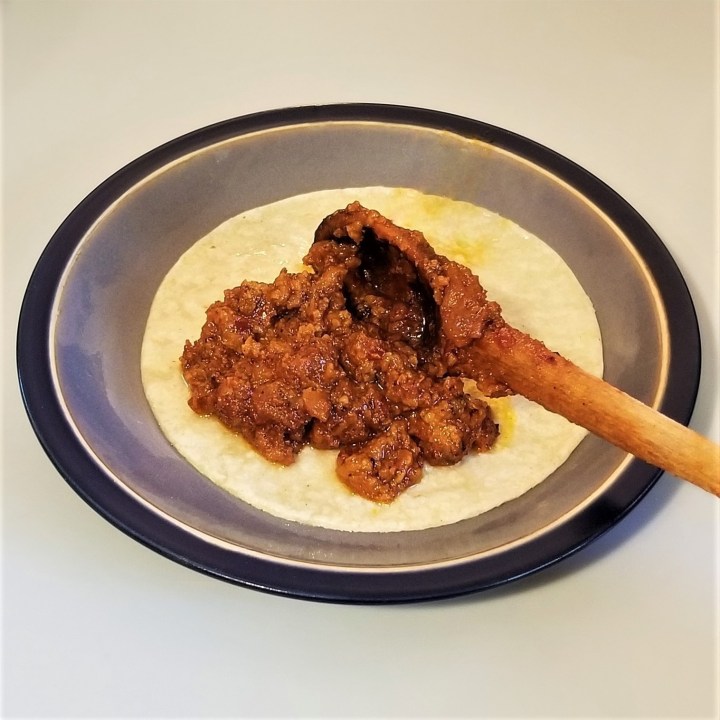
The tortilla does not need to float in the oil, just a quick sweep on both sides will suffice; then tap lightly on top of other tortillas to remove excess oil. Scoop filling of choice onto tortilla, forming a mound on one half, as shown below with potato (left), bean (centre) and chicharrón (right) fillings:


Fold tortilla in half to form the taco, then place in prepared basket, or slow cooker. Repeat with more tortillas and fillings, arranging the tacos slightly overlapped, and separated by flavour, in the basket or pot (photo below, left). Once a layer is completed, place some of the fried onions on top (photo below, right):
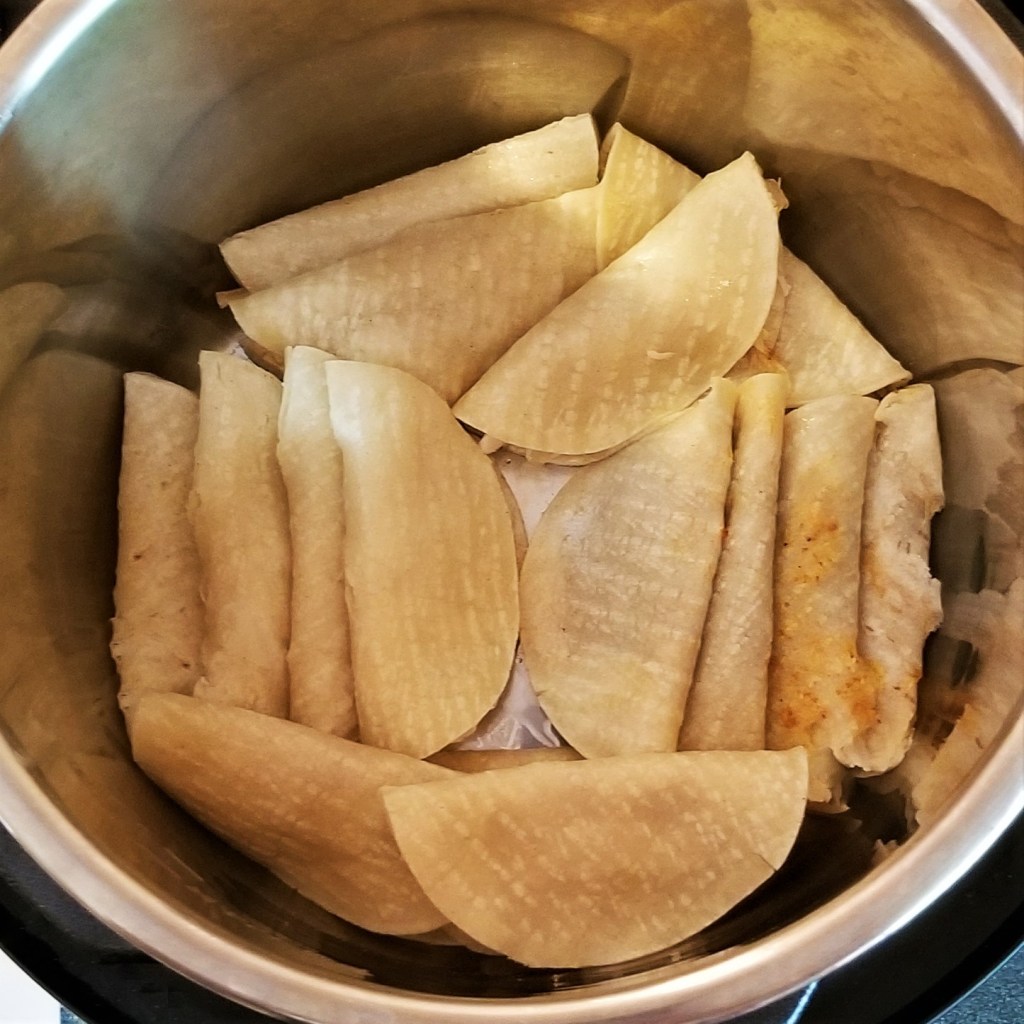
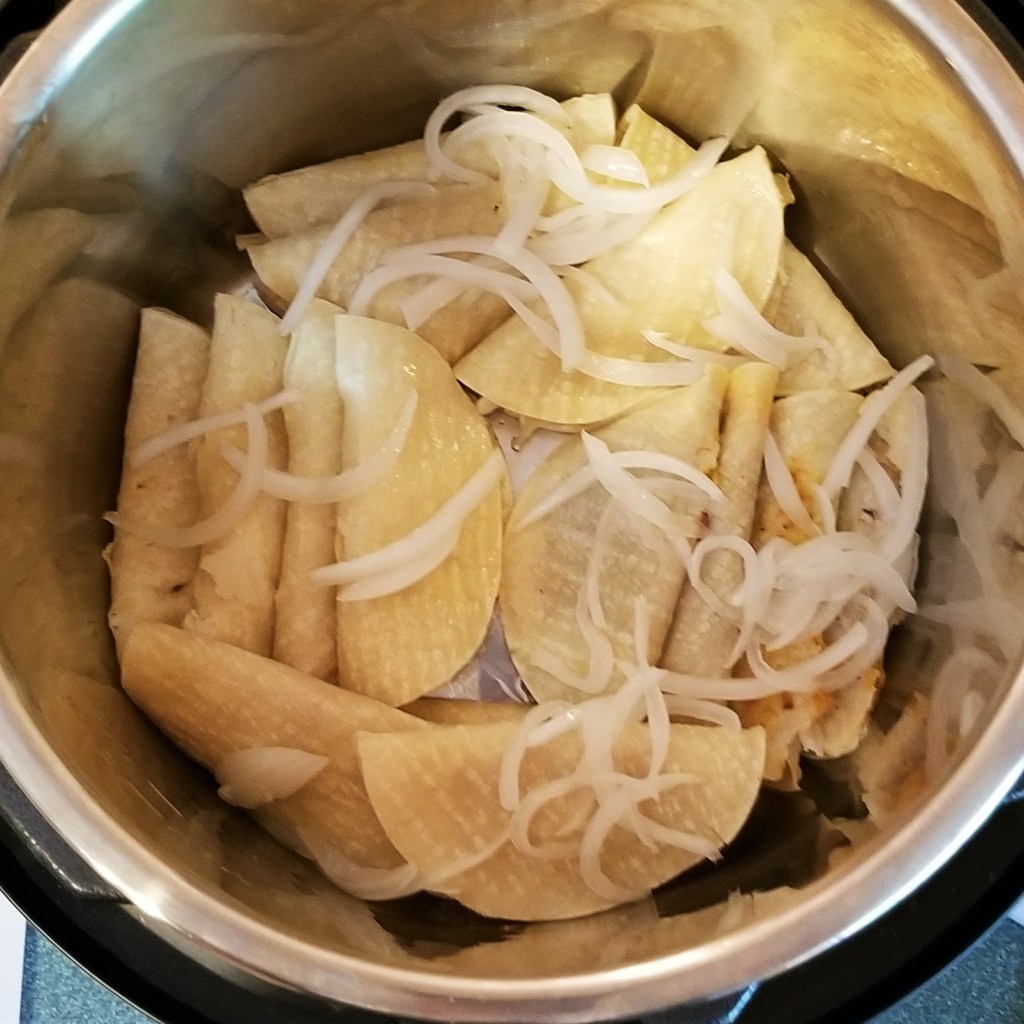
Assemble more tacos, arranging a second layer on top of the first (photo below, left). Cover with more onions, and continue assembling and alternating layers until all fillings and tortillas are used up. Finish with onions, and pour any remaining oil (or lard) on top. Cover tacos with parchment paper or Aluminium foil (photo below, right):
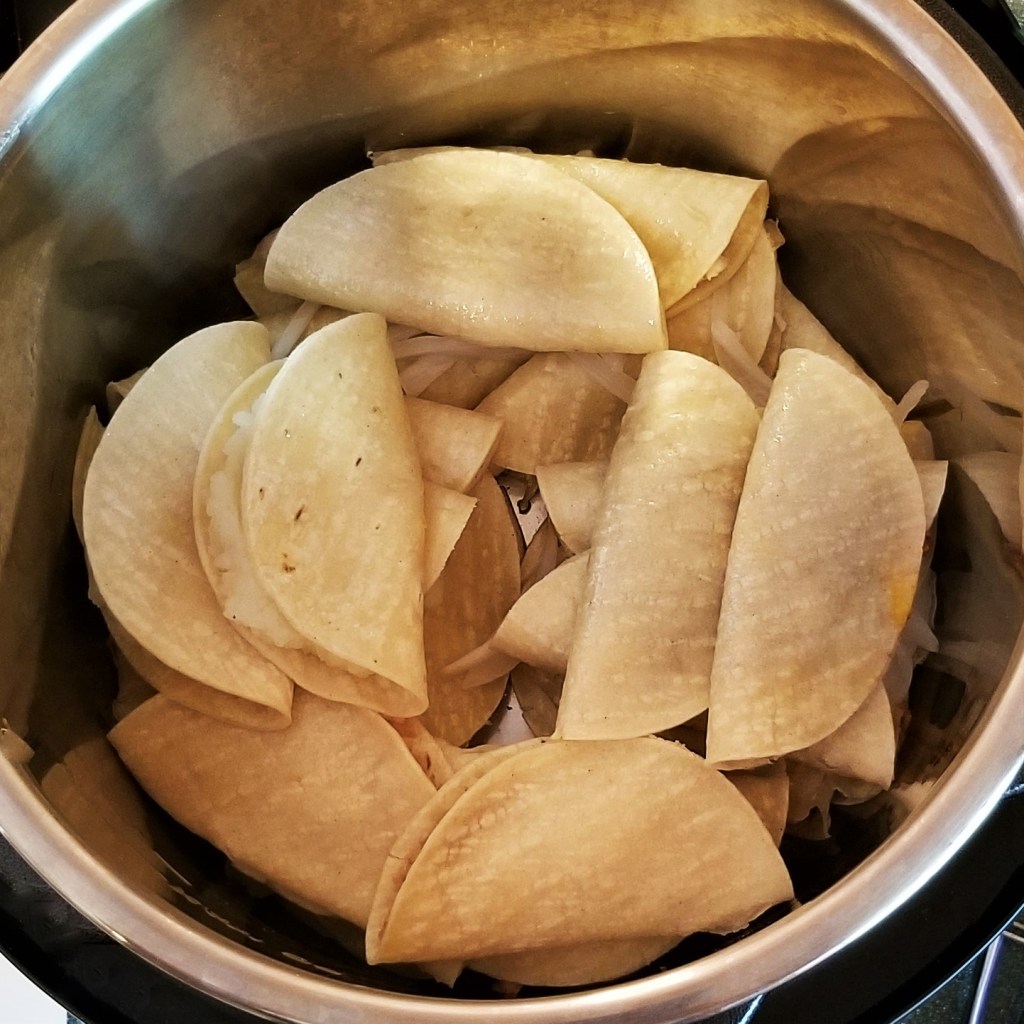

If using a basket or lined container, close all the layers of paper, plastic and cloth, and allow tacos to “sweat” for one to two hours before serving.
If using slow cooker, close the lid and set on high for one hour, then turn down to low, or “keep warm” until serving time.
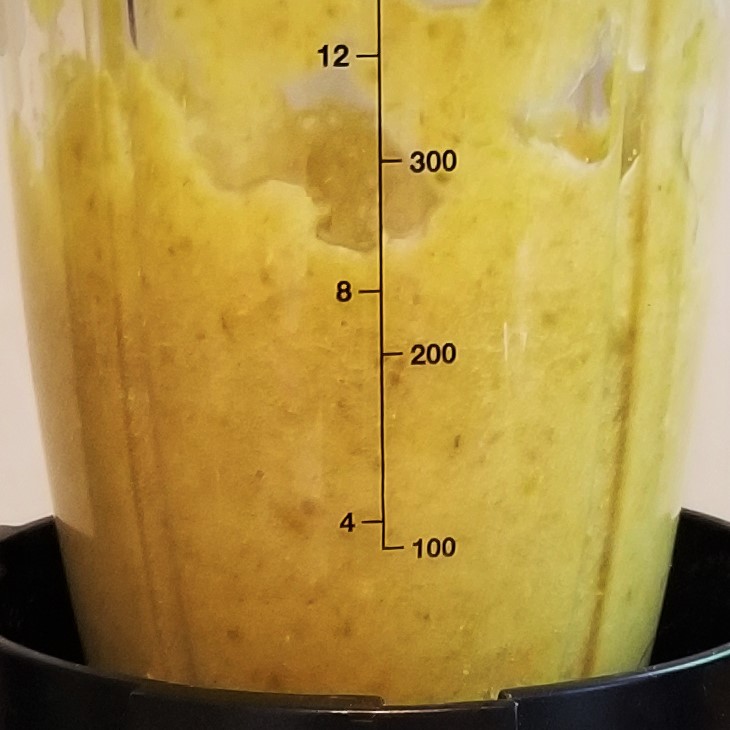
While the tacos are “sweating”, prepare the sauce: chop one quarter of the onion and reserve, then place the other quarter in a blender jar, along with the jalapeño peppers, their liquid, garlic and just a pinch of salt, since peppers are already seasoned (photo below, left). Process for a few seconds, until all ingredients are incorporated into a sauce (photo below, right):

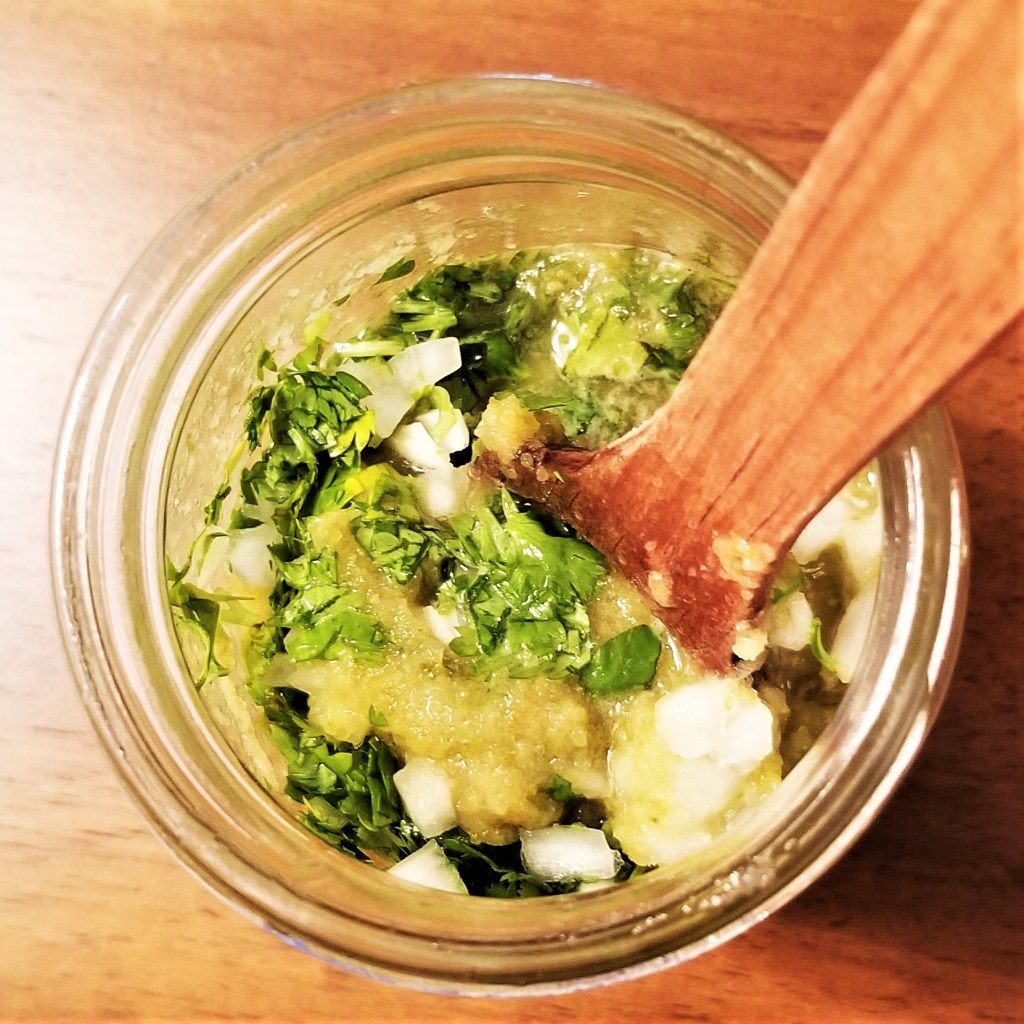
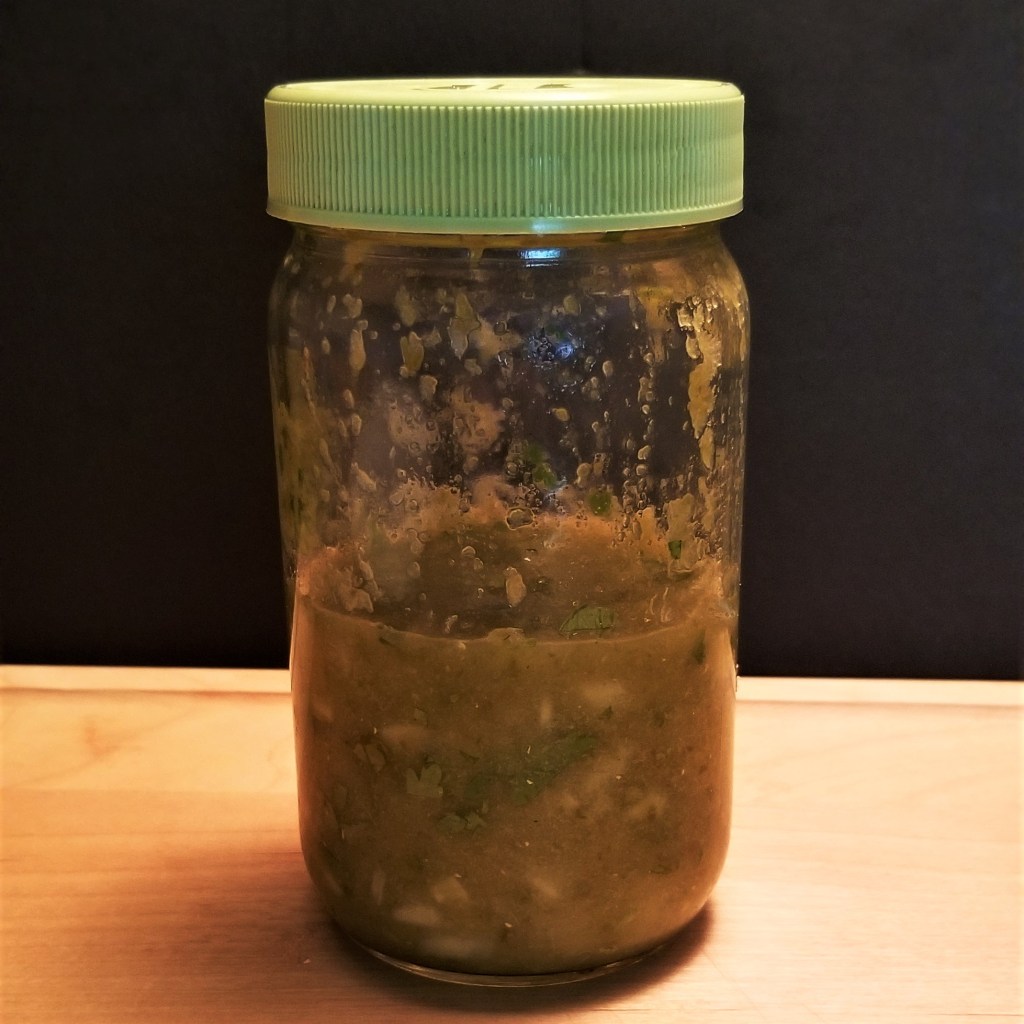
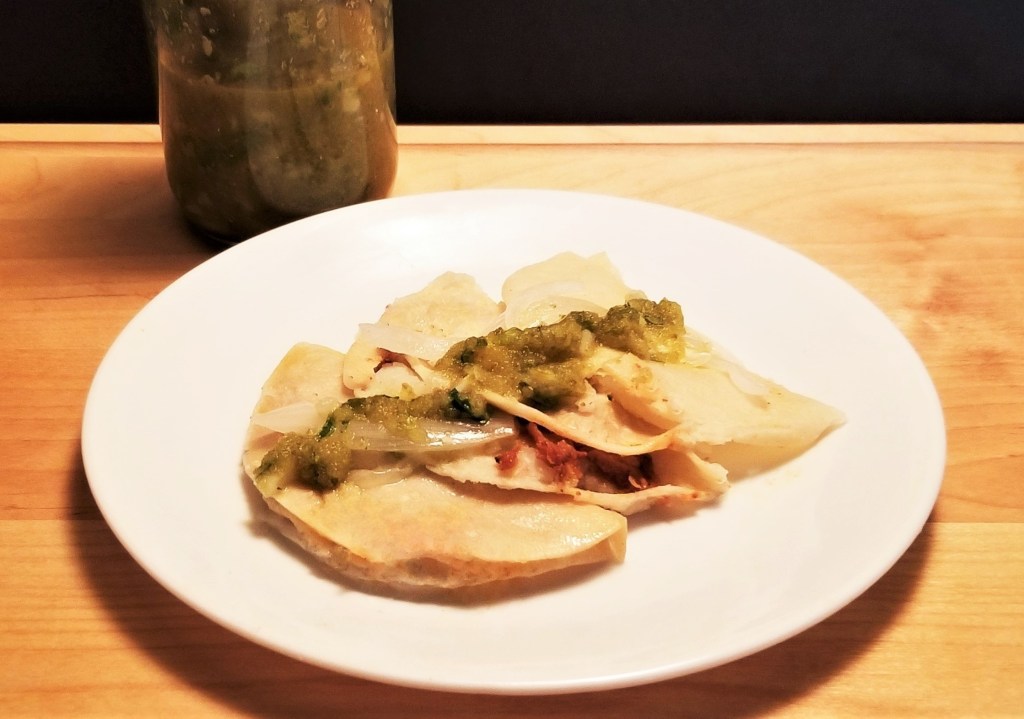
Transfer to a jar and mix in reserved chopped onions and cilantro, adjusting seasoning with more salt, if needed (photo below, left). Keep in jar until serving time (photo below, right; I poured it into a repurposed glass jar, a memento of those old mayo jars back in the day):
Serve “sweaty” tacos right out of the basket, container, or slow cooker, picking flavours as sorted out, then adding some of the onions, and sauce:
This modified recipe produced tasty tacos, a little less greasy than when using the traditional method of pouring hot fat over the whole batch. I must admit that I took a gamble, and my tacos were indeed not as sturdy as the drowsed ones out of a basket, but for eating at home, they were still strong enough, especially when consumed shortly after one hour of resting time. Using the slow cooker was very convenient, maybe not as picturesque as the classic basket lined with blue plastic, but great for easy clean up and just as good for keeping the tacos warm and “sweaty”. The sauce was fiery spicy hot, exactly as that classic bright green concoction coming out of a giant mayo jar from a taquero on a bike.
Although leftover tacos de canasta will not maintain their shape and texture well in general, they may be kept in the fridge overnight, re-heated the next day, and enjoyed, perhaps with the help of a fork.
I am bringing my recipe to Full Plate Thursday #603 with Miz Helen @ Miz Helen’s Country Cottage.
I am sharing my post at Thursday Favourite Things #555, with Bev @ Eclectic Red Barn, Pam @ An Artful Mom, Katherine @ Katherine’s Corner, Amber @ Follow the Yellow Brick Home, Theresa @ Shoestring Elegance and Linda @ Crafts a la Mode.
I am joining Fiesta Friday # 447 with Angie @ Fiesta Friday.
I am also sharing my recipe at What’s for Dinner? Sunday Link-Up #382 with Helen @ The Lazy Gastronome.


This was and interesting post and I would love to try this recipe. Thanks for sharing.
LikeLiked by 1 person
You take such great photos to illustrate all the steps. Top notch!
LikeLiked by 1 person
Thank you, Eilene!
LikeLiked by 1 person
I love this post! Thanks for sharing the process on how to make tacos de canasta. They are my favorite! I’m not sure if you’ve seen the TV series on Netflix “Taco Chronicles” they have a special documentary on Tacos de Canasta, it’s very interesting.
LikeLike
Thank you for your kind review! Yes, I did watch the whole series, including tacos de canasta.
LikeLiked by 1 person
I love the recipes you bring. My husband and I love real Mexican food. Thanks for Sharing at the What’s for Dinner party! Hope the last weekend of summer is going fantastic!
LikeLiked by 1 person
Thank you so much, Helen, enjoy your end of summer, too, and thank you for hosting!
LikeLike