
In my previous post, making tlayudas felt like a true privilege, to be able to reproduce the artisan oversized tortillas from the Mexican state of Oaxaca. Preparing them as pictured above, is very simple. Usually the first layer would be “asientos” , sometimes called “cracklins” or “cracklings” in English; asientos are the small bits collected from the bottom of a pot, after rendering fat from pork or other meats. Since this ingredient might be hard to find, and because I wanted to have a vegetarian option, I omitted it, also keeping the dish a little healthier, as a bonus.
For the cheese, the traditional choice is quesillo, also known as queso Oaxaca (“Oaxaca cheese”, as pictured below, left) made from curds that are heated and stretched, then formed into a ball with a twist. This cheese is easy to take apart and separate into thin threads (photo below, right), and makes for a stringy and delicious topping when melted.
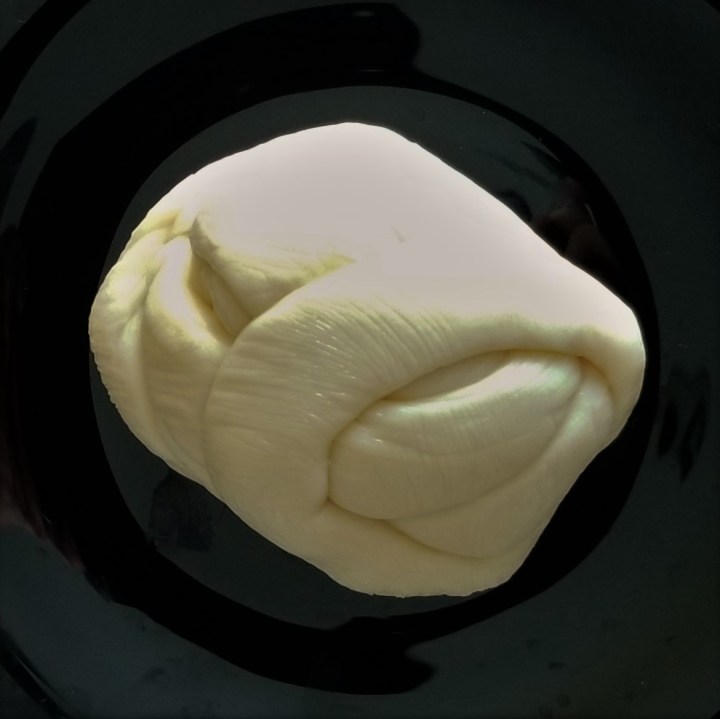

If authentic Oaxaca cheese is not available, a good fresh mozzarella torn apart into bits, or grated pizza mozzarella cheese will also be appropriate and very tasty.
Tasajo refers to meat that has been treated to become partially dry. In Spain and several Latin American countries, it is by means of smoking, often applied to venison; in Mexico, the process takes place exclusively by salting, after pounding cuts of venison or beef into very thin strips. Salting meat is a very well established technique, used in the olden days with profusion to inure long shelf life to meat for long trips, especially at sea. Nowadays, it is still a useful procedure, not so much to preserve meat, but as a great flavour enhancer, as explained so clearly in Cook’s Illustrated: “Salting helps proteins retain their own natural juices … When salt is applied to raw meat, juices inside the meat are drawn to the surface. The salt then dissolves in the exuded liquid, forming a brine that is eventually reabsorbed by the meat.” It is a fun science project, but omit for a vegetarian option.
Prepared Tlayudas – Vegetarian and with Tasajo
Tlayudas preparadas – Vegetarianas y con tasajo
Other printable recipes:
Tlayudas
homemade frijoles de la olla
Marinated Red Onions
Red Sauce (without tomatoes) or Deviled Sauce
Ingredients (for 4 portions)
4 tlayudas (printable recipe above)
2 cups cooked black beans (homemade de la olla, printable recipe above, or canned)
2 tbsp oil
2 cups stringy cheese (such as Oaxaca style or mozzarella); pulled apart or shredded
2 cups lettuce or cabbage; washed and shredded
1 cup onions, sliced thinly; fresh, or marinated red onions (printable recipe above)
Red hot sauce (homemade, for example, printable recipes above, or from bottle)
For Tasajo (omit for vegetarian option)
1 lb (454 g) beef steak, such as flank or sirloin
3 tsp coarse salt; such as Kosher
2 tbsp oil
If using, prepare tasajo first: I found already thin, fast fry steaks; if the cut is thicker than 1/4 inch (1/2 cm approx.), slice into strips, about one inch wide. Place pieces of meat on sheets of parchment paper, on a flat working surface (if using sliced meat, arrange cut side up); cover with another sheet of parchment paper and lively pound all over the surface with a meat pounder (the smooth tool, not a tenderizer) or a rolling pin (pound, do not roll):
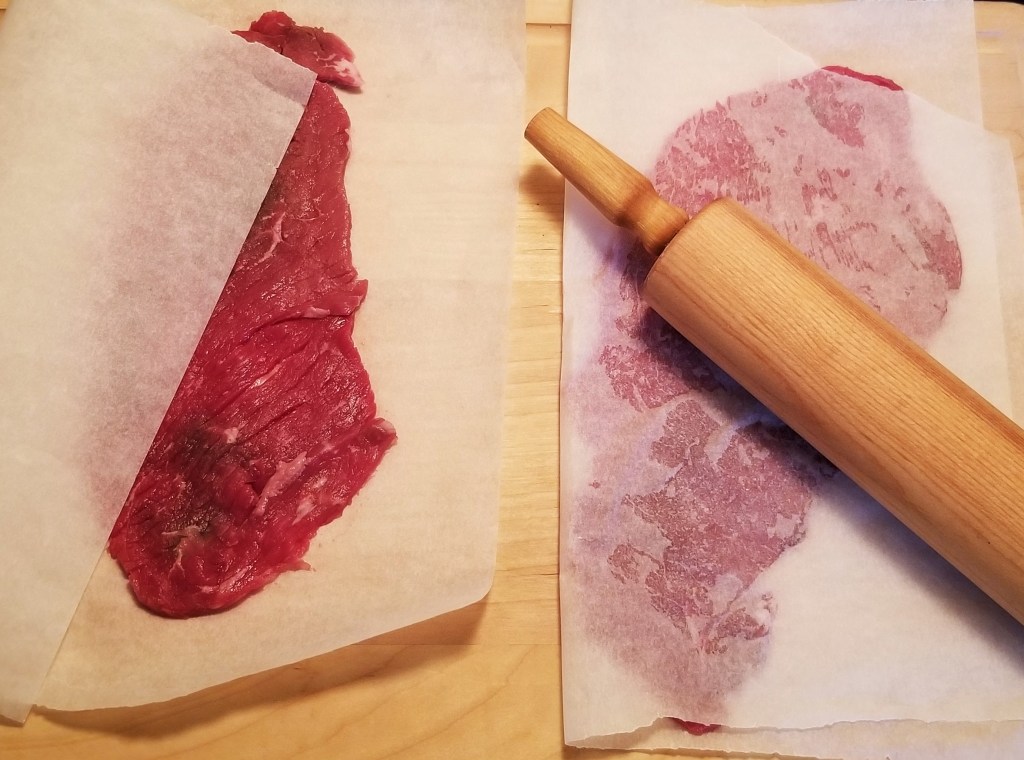
The resulting piece of meat should be very thin and almost breaking, but still holding in one piece; uncover and sprinkle with salt:

Flip over onto a cooling rack or wire grill and sprinkle the other side with salt, as well:

Allow to rest for two hours on the counter, and then keep in the refrigerator until needed.
Prepare black bean spread: Although the beans may be pressed by hand, in this case it is easier and faster to process in a blender, to obtain a very smooth paste. Place black beans in a blender jar with enough liquid from the pot (or water, if using canned) to process into a very smooth, slightly runny, paste . Warm up two tablespoons of oil in a pan over medium heat and fry the paste, stirring until a spread is obtained:

Remove from heat and set aside.
To prepare the tlayudas: cover one side with bean spread (photo below, left); place on a wire rack and top with a generous amount of cheese (photo below, right):


At this point, the tlayudas may be grilled, even over an open fire, or broiled in the oven, until the cheese completely melts and the tlayuda becomes golden brown and crispy. If using tasajo, brush with oil and grill next to the tlayudas, or fry in a greased pan (as shown below) while the tlayudas are in the oven. The thin meat only takes about one minute per side, so do not leave unattended, and flip promptly:

The vegetarian tlayuda is finished with shredded lettuce (or cabbage) and topped with onions (in this case, marinated):
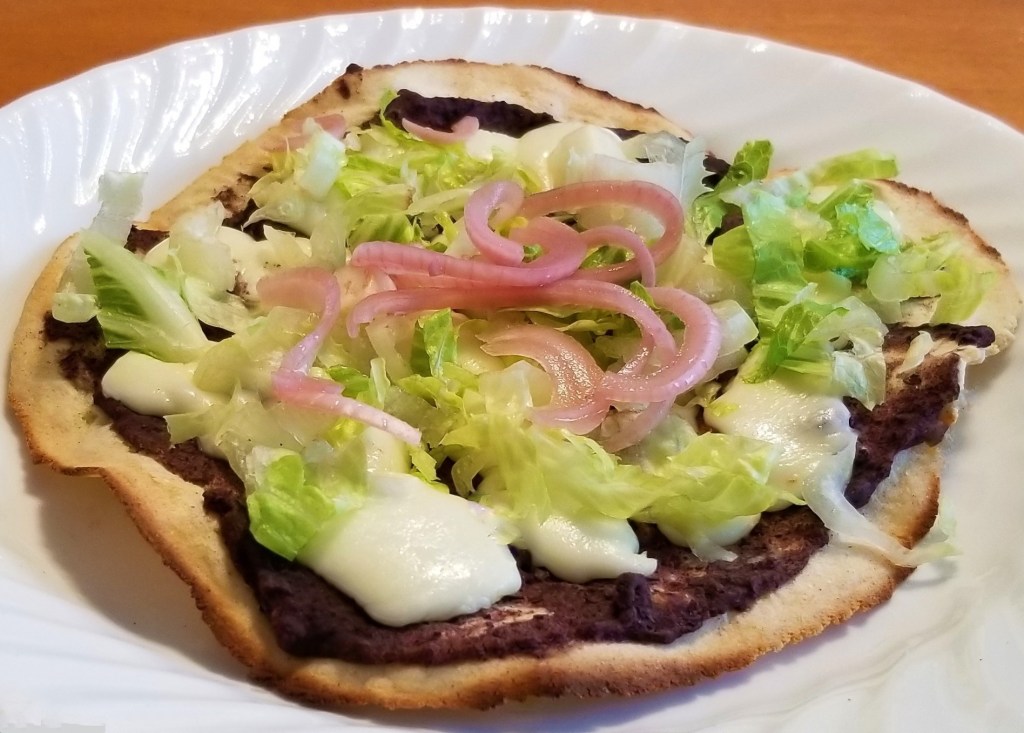
Add sauce for a spicy punch. And for the meat lovers, add a piece of tasajo on the side, as shown at the top of this post. Eat right away, folded in half like a large quesadilla, or by breaking pieces off:

It is so satisfying to pull apart and see how long the cheese will stretch:

I am bringing my recipe to Thursday Favourite Things #443 with Bev @ Eclectic Red Barn, Pam @ An Artful Mom, Katherine @ Katherine’s Corner, Amber @ Follow the Yellow Brick Home, Theresa @ Shoestring Elegance and Linda @ Crafts a la Mode.
I am joining Full Plate Thursday #488 with Miz Helen @ Miz Helen’s Country Cottage.
I am bringing my Prepared Tlayudas and Tasajo to Fiesta Friday # 332 with Angie @ Fiesta Friday, this week co-hosting with Laurena @ Life Diet Health.
I am sharing my recipe at What’s for Dinner? Sunday Link-Up #257 with Helen @ The Lazy Gastronome.


wow, just wow
LikeLiked by 1 person
Thank you, so glad you liked it!
LikeLiked by 1 person
I liked the look of it, I fear if I tried it, it’d probably look different 🙂
LikeLike
But what’s important the most is the flavour 😋
LikeLiked by 1 person
These look fabulous, Irene!
LikeLike
Thank you, Jennifer!
LikeLiked by 1 person
Yum! I have to ask… how long does it take you to put together one of these posts?
LikeLiked by 1 person
They are done in stages: I plan the theme; research the recipe, history, ingredients, etc., then I line up the recipe on a schedule for cooking and taking photos; then a photo editing session. By the time I sit down to prepare the post, I have all the materials and information ready, so the actual writing takes maybe a couple of hours ( and I also check prompts 😉). It’s hard to say how long the whole process takes, because there’s always several items being developed, at different stages. If I worked on just one at a time from beginning to end, I would say 4-6 hrs plus cooking (which feeds the family, so it has to be done anyway, hehe).
LikeLiked by 2 people
Thank you for doing such a thorough job & sharing delicious dishes & history. You should be generating income for all of that work! 😊
LikeLike
He he, thanks Sue, and thank you for reading; maybe I will have time to put a book together at some point.
LikeLiked by 1 person
I think you should! It would make the topsellers’ list!
LikeLiked by 2 people
That looks delicious, Irene.
LikeLike
Thank you, Tracy! They were very tasty.
LikeLiked by 1 person
Looks delicious! So what do you do with the meat? Tear into pieces?
LikeLike
Yeah, it is so tender, it doesn’t take much effort; the eat-with-your-hands experience is great (but I also wanted to show the whole piece for the photo, he he). You may also put it inside your giant quesadilla, or cut into bite size pieces before serving.
LikeLiked by 2 people
Can I just come and stay! 😛 This looks and sounds fabulous! Thanks for sharing at Fiesta Friday!
LikeLiked by 2 people
Any time, Laurena!
LikeLiked by 2 people