
Cemitas are baked goods that might take very different forms depending of the region where they are prepared. It is believed the name came from Spain and originally referred to low quality bread, often prepared with castoffs of unrefined flour or bran (known as acemite or salvado, in Spanish.) In Argentina, a cemita still refers to bread made with whole wheat or bran, but in the rest of Latin America, the transition to other – very different – types of bread known as cemitas has become a blur of anecdotal stories. In Central America, for example, the name might bring images of a layered cake, filled with fruit; even in Mexico, cemitas might be sweet breads filled with piloncillo (raw sugar) in the state of Guerrero. However, in the state of Puebla, they are savoury buns made with a little more yeast than usual white bread and, before baking, they are brushed with a sweetened slurry together with a sprinkle of sesame seed; this technique produces a very fluffy crumb inside, and a golden colour, and extra crispiness on the outside. In a previous post, I shared a recipe for Puebla style cemita sandwiches, which had to be prepared, of course, on Puebla Style cemita buns, so here is the recipe.
Puebla Style Cemita Buns –
Cemitas estilo Puebla
Printable recipe: Puebla Style Cemita Buns
Ingredients
4 cups (500g) all-purpose flour
1 tsp (6g) salt
3 tsp (11g) instant dry yeast (does not need to be activated)
1 ¾ cups water, approximately, or as needed; warmed up to around 110°F (43°C)
For slurry:
½ cup water
1 tbsp (13g) granulated sugar
1 tbsp 9.5g) corn starch (such as Maizena™, known as corn flour in Great Britain)
Place flour in a large bowl, forming a well in the middle. Sprinkle salt around the flour. Add one cup of the warm water to the well (photo below, left). For this recipe, I am using instant dry yeast, which does not need to be activated and may be mixed with the dry ingredients, but I always prefer to add it to the warm water, to make sure it is viable (photo below, right):


Incorporate a little flour to the well, and gently mix with the water and yeast (photo below, left). Allow to rest until it starts to bubble (almost right away to a minute or two), as seen in the photo below, right:


This means that the yeast is still viable. Continue incorporating small amounts of flour to the centre (photo below, left), adding the rest of the warm water, as needed (I added three quarters of a cup on top of the initial cup), until all the flour is well hydrated; transfer to a clean working surface (photo below, right):

The mix should be very moist and brittle. At this point, do not sprinkle flour on the working surface, or dough, which will be sticking to hands and working surface; work by gently kneading with one hand, and gathering dough and folding with a spatula (see *NOTE at the end). The photo below, left, shows the progress after two minutes of kneading and folding. Continue for about 8 minutes, noticing how the dough starts to feel more elastic, and may be gathered off the working surface (photo below, right, after four minutes):


In the photo below, left, (after six minutes), the dough is almost ready, not sticking to hands. At the eight minute mark, the dough was soft, uniform, and could be shaped easily. Let it sit for a couple of minutes, then sprinkle with a little flour (photo below, right):


Flip the dough and fold the flour in a few times. I like to test the elasticity by gently pulling a section of the dough; it should not break before it becomes very thin (the “window test”, photo below, left). Fold the dough inwards, pinching towards the centre, to form a ball; place the seam at the bottom (photo below, right):


Grease the mixing bowl with a little oil, place the dough back in (seam down) and grease the top (photo below, left). Cover with a clean kitchen towel (photo below, right):


Allow to rest until it doubles in size, between one to two hours, depending on the temperature and humidity of the room.
While the dough is rising, prepare the slurry for brushing. Warm up a quarter of a cup of water in a small saucepan over high heat, then add sugar and stir until it dissolves (photo below, left). Lower heat to medium and continue cooking. In a separate mixing cup or bowl, mix a quarter cup of cold water with the corn starch (photo below, right):


Pour corn starch mix into the saucepan, stirring constantly to avoid clumps (photo below, left); cook, stirring constantly, just until the slurry thickens, then remove from heat (photo below, right):


Allow slurry to cool down.
The dough doubled its size after one hour for this particular batch:

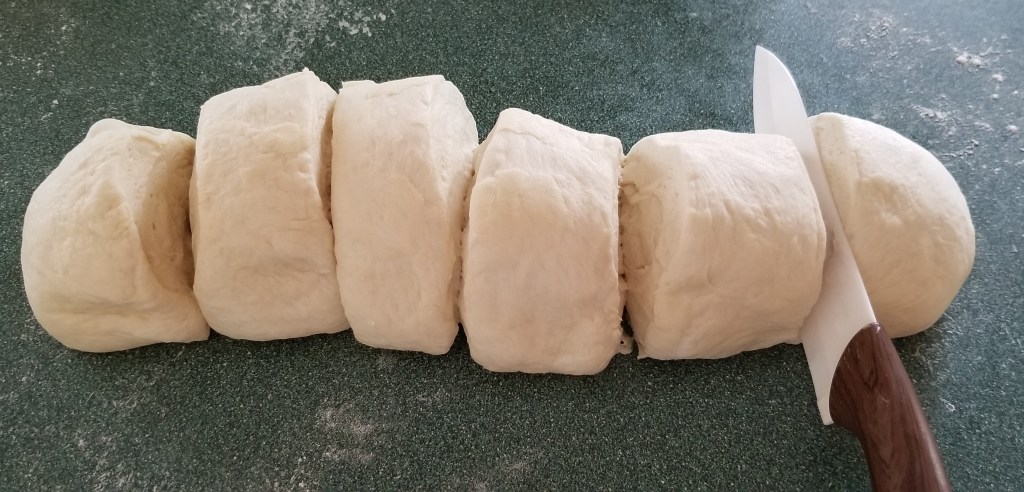
Transfer to working surface, punch down into a thick disc, then roll into a log:

Slice log into six modular pieces with a very sharp knife or pastry blade:
Form each piece into a ball, by folding inwards and pinching dough towards the centre; place on working surface, seam down. Cover with the kitchen cloth:

Allow the balls to rest for ten minutes, then uncover. Working with one ball at a time, squeeze a section approximately of one third of the ball between the thumb and index, to form a “snow man” shape of two linked balls:

For each piece, twist the junction once, then place it on the working surface and press the smaller ball flat (photo below, left). Fold over on top of the bigger ball, like closing a clam shell (photo below, right):


Pinch the edge all around to seal the two sections together, then gently flatten the whole bun. Place on a baking tray lined with parchment paper, and repeat with all the pieces (photo below, left). Brush the top and edge of the buns with the reserved, cooled down, slurry (photo below, right):


Place the tray in a warm spot, away from drafts, and allow the buns to rise for half an hour. In the photos below, the buns after brushing with slurry, on the left, and after resting, right:


Preheat oven to 400°F (200°C).
Brush the buns with a second coat of slurry, careful not to press too hard, then sprinkle with sesame seed on top (photo below, left). On the photo, right, the buns are ready for the oven:


Place the tray in the middle of the oven (photo below, left). Allow to bake for 25 to 30 minutes, until the buns have risen a little more and look golden brown and crispy (photo below, right):


Remove tray from oven and allow buns to cool down for a few minutes:

I could have cried! These are by far, some of the best buns I have ever baked. When squeezed, they made crunchy crackling noises, and the cross section revealed a super fluffy, soft crumb:

They looked really pretty, golden brown with the help of the sugar and starch from the slurry coating, and very tall with the “bump” formed by the top layer of dough. The sesame seed gave them the ultimate seal of Puebla style cemita authenticity. These buns are large, ideal to prepare the mighty cemita sandwich. Slice horizontally to be filled:

And click here for detailed instructions to prepare a Puebla style cemita sandwich, with your own homemade cemita bun:

As I mentioned in that post, the resulting sandwiches are big enough to share, and become a full meal with a side salad or soup. For smaller buns, the dough may be divided into eight pieces, although this is the most popular size for cemitas preparadas (prepared cemitas.)
* NOTE: I used to torture my yeast doughs while kneading, by pounding and pushing them against the working surface, but recently, I started watching “Bake with Jack” on YouTube; he explains that this is not only unnecessary, but might actually end up damaging the structure of the dough, and even prolong the required kneading time. He actually has a video in real time (a lot of fun to watch and learn the proper technique), showing how in approximately 8 minutes, a batch of basic white bread dough is ready. He also recommends not adding any flour at all to the dough or the working surface until after the kneading is done, at which time he allows the dough to rest for 3 minutes; adding a sprinkle of flour before forming the round shape for rising is fine at this point. I followed his method, and I was amazed at how well it worked for me, as it may be seen in this recipe.
I am bringing my recipe to Full Plate Thursday #540 with Miz Helen @ Miz Helen’s Country Cottage.
I am also joining What’s for Dinner? Sunday Link-Up #319 with Helen @ The Lazy Gastronome. Thank you so much to Helen for featuring my Puebla Style Cemita Sandwich at this party.
I am sharing my recipe at Happiness is Homemade #379 hosted by Linda @ A Labour of Life, Sinea @ Ducks ‘n a Row, Beverly @ Eclectic Red Barn, Katie @ Love My Messy Messy Mess, Mel @ Décor Craft Design, and Niki @ Life as a Leo Wife.


I’ve always enjoyed the pursuit of bread-making since my grandmother taught me as a child. This looks like a great recipe. Thank you!
LikeLiked by 1 person
The new kneading technique is interesting. I’ve been pursuing non-knead recipes, which have been working well for me. These buns look perfect!
LikeLike
They are delicious, and that coating makes them extra crispy.
LikeLiked by 2 people
They do look really delicious. 🙂
LikeLiked by 1 person
Thank you, Kristian!
LikeLiked by 2 people
Pinned!! These look delicious and easy! Thanks for sharing at the What’s for Dinner party! Have a great week.
LikeLiked by 1 person
Thank you, Helen, and thank you for hosting!
LikeLiked by 1 person